Commercial Solar Installation in South Africa: A Complete Step-by-Step Guide
Getting a commercial solar system installed is not like buying a consumer appliance. It is a bespoke engineering project that involves structural assessment, electrical design, procurement, civil work, and a regulatory sign-off process. Businesses that understand the process go in with realistic expectations, ask the right questions, and end up with better installations at fairer prices. This guide walks you through every stage.
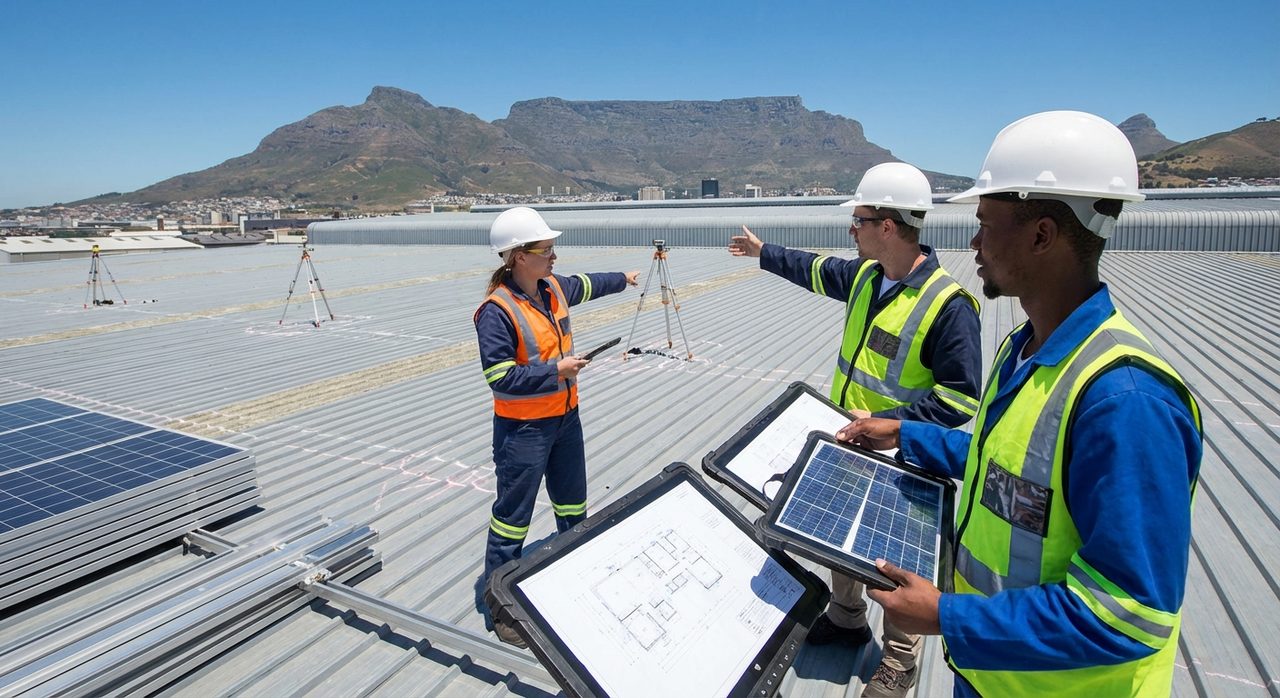
Stage 1: The Site Assessment
Everything starts with a professional site assessment. A reputable solar company will visit your premises before providing a quote — be wary of companies that quote purely from a satellite image or a phone call, as they cannot accurately assess the site-specific factors that determine system design and cost.
What Happens During a Site Assessment
- Roof survey: The installer measures available roof space, checks the roof's condition and age (old or damaged roofs should be repaired before solar is installed), identifies load-bearing structural members for mounting point attachment, and assesses roof pitch and orientation.
- Shading analysis: Surrounding trees, neighbouring buildings, roof plant, and penthouses are assessed for their shading impact throughout the day and seasons. Shading on even a small portion of a solar array can have a disproportionate impact on output if the system isn't designed to mitigate it.
- Electrical assessment: The installer reviews your main distribution board, metering arrangement, and available space for inverter and battery installation. They confirm the available grid supply capacity and assess earthing and protection arrangements.
- Load data collection: Your electricity bills for the past 12 months are reviewed. If interval data is available, this is collected. Critical loads are identified for battery backup sizing.
- Structural assessment: For larger systems, a structural engineer may need to confirm that the roof can support the additional load of panels and mounting hardware. Most modern commercial buildings can accommodate rooftop solar, but older buildings may require reinforcement.
Stage 2: System Design and Quoting
After the site assessment, the installer produces a system design and quotation. You should obtain at least three quotes before making a decision. Do not award the contract purely on price — the cheapest quote often reflects compromises in component quality, system design, or warranty coverage that you will regret over a 25-year system life.
What a Good Quote Should Include
- Full bill of materials with brand names and model numbers for every major component (panels, inverter, batteries, mounting hardware)
- System size in kWp (solar) and kWh (battery storage)
- Estimated annual energy production in kWh
- Estimated annual electricity saving in kWh and rands
- Simple payback period calculation
- Panel layout diagram and single-line electrical diagram
- Workmanship warranty (minimum 5 years for a reputable installer)
- Product warranty pass-through terms (what happens if a panel or inverter fails)
- Payment terms and installation timeline
- Whether a Certificate of Compliance (COC) is included
Red Flags in Quotes
- No physical site visit before quoting
- Vague component specifications ("premium panels" without brand/model)
- Workmanship warranty of less than 2 years
- No mention of Certificate of Compliance
- Pressure to sign quickly or "price only valid for 24 hours"
- No SAPVIA accreditation or verifiable installation references
- Estimated production figures that seem implausibly high
Evaluating Component Quality
Not all solar panels and inverters are equal. For panels, look for Tier-1 manufacturers — a classification maintained by Bloomberg NEF based on financial stability and manufacturing quality. Tier-1 panel manufacturers include Longi, Jinko, Canadian Solar, Trina, JA Solar, and REC, among others. For inverters, established brands with South African service centres include Victron Energy, SolarEdge, Fronius, Solis, Goodwe, and Deye. Unknown brands from grey-market importers should be avoided — warranty claims on failed equipment from a company with no local presence are worthless.
Stage 3: Approvals and Permitting
Before installation can begin, several approvals may be required depending on your specific situation.
Municipal Approval for Grid-Tied Systems
Grid-tied and hybrid solar systems that feed surplus power to the grid require a Small-Scale Embedded Generation (SSEG) application to your local municipality or Eskom (if you are an Eskom direct supply customer). The SSEG process involves submitting technical specifications for approval before installation and registering the system after commissioning. Some municipalities have streamlined this process; others are notoriously slow. Your installer should manage this process on your behalf and be familiar with your specific municipality's requirements.
Note: South Africa's Electricity Regulation Act and subsequent regulations have established a framework for SSEG, but implementation varies significantly by municipality. Your installer should know the local process.
Body Corporate Approval
If your premises are in a sectional title scheme or managed estate, you may need body corporate or HOA approval before installation. Solar installations on a sectional title scheme's common property (roof) require a special resolution under the Sectional Titles Schemes Management Act in most cases. Allow time for this process — it can take weeks depending on the governing body's responsiveness.
Building Plan Approval
Ground-mounted systems and certain roof-mounted systems above a threshold size may require building plan approval from the local municipality. Your installer should advise you on whether this applies to your specific installation and can typically manage the submission on your behalf.
Stage 4: Equipment Procurement
Once the contract is signed and a deposit paid (typically 50–60%), your installer orders the equipment. Lead times for solar panels and inverters have improved significantly since the supply chain disruptions of 2021–2023. Current lead times in South Africa:
- Solar panels: 1–3 weeks (most brands held in local stock)
- Hybrid inverters: 1–4 weeks depending on brand and model
- Lithium batteries: 2–6 weeks (popular models often in stock; specialised sizes may be ordered)
- Mounting hardware and electrical components: 1–2 weeks
For large systems (500 kWp+), procurement may take 2–3 months and is typically managed with a letter of credit or staged payment structure.
Stage 5: Physical Installation
The installation itself is a structured, multi-day process. For a typical medium commercial installation (30–100 kWp), expect 3–7 working days of site work, depending on roof complexity, battery bank size, and cable routing challenges.
Day 1–2: Structural and Roof Work
Mounting rails and brackets are fixed to the roof structure. For IBR or Kliplok roofs, clamps attach to the ribs without penetration. For flat concrete roofs, ballasted frames are positioned and weighted — no penetrations required. Tile roofs require tile removal and waterproof flashing around each penetration. The quality of this work is critical for weatherproofing — insist on waterproofing being demonstrated before panels are installed.
Day 2–4: Panel Installation and DC Wiring
Panels are lifted onto the roof and clipped into the mounting rails. DC cables are run from the panels to the inverter location, routed through conduit or cable trays. String configurations are verified against the design. Junction boxes and DC isolators are fitted.
Day 3–5: Inverter, Battery, and AC Wiring
The inverter and battery bank are installed in the designated location — ideally a cool, ventilated space such as a plant room, server room, or dedicated enclosure. AC wiring connects the inverter to the main distribution board. A dedicated solar supply circuit and safety isolators are fitted. For grid-tied systems, a generation meter is installed.
Day 5–7: Testing and Commissioning
The system is energised and tested panel by panel, string by string. Inverter firmware is updated to the latest version. Battery communication is verified. Monitoring is configured and tested. The installer walks you through the monitoring app and explains how to read the system's performance data. Abnormal readings are investigated and resolved before sign-off.
Stage 6: Certificate of Compliance and Handover
A qualified electrician must issue a Certificate of Compliance (COC) for all electrical work. This is a legal requirement under the Occupational Health and Safety Act and is required by your insurer. Do not accept a solar installation without a COC — it exposes you to significant liability if there is ever an electrical incident on the premises.
Your installer should also provide:
- As-built drawings showing the final installed configuration
- Product manuals and warranty documentation for all major components
- Monitoring system access (app credentials and user training)
- Contact information for warranty claims and service
- Confirmation of SSEG registration with your municipality (for grid-tied systems)
After Installation: Monitoring and Performance Management
Once installed, your solar system should be monitored regularly. Most modern systems include cloud-connected monitoring that provides real-time and historical production data. Review your monthly production report against the installer's projections. A system consistently producing 10–20% below design expectations may indicate a fault, soiling, or shading issue that should be investigated.
Schedule a professional service check at 12 months post-installation and annually thereafter. This typically involves cleaning panels, inspecting all electrical connections for corrosion or loosening, verifying inverter and battery performance, and updating firmware.
How Long Does the Whole Process Take?
- Site assessment to quote: 3–7 days
- Quote evaluation and decision: 1–4 weeks (your timeline)
- Approvals (SSEG, body corporate if required): 2–12 weeks
- Equipment procurement: 2–6 weeks
- Physical installation: 3–7 working days
- COC and grid connection: 1–3 weeks
From decision to operational system: typically 6–16 weeks for a commercial installation. Plan accordingly — don't expect to have solar generating by next month if you haven't started the process yet.
Ready to start? Contact us for a site assessment. Also worth reading: How to size your system and solar financing options.